Last week Kathy described her process for tying a warp onto the front apron rod. This week, I’ll tell you how and why I do things a little differently.
To be clear: both methods work! Neither one of us is trying to convince you our way is better! Our goal is to just show you the similarities and differences between our methods in order to
- Give you more details and more options for tying on,
- Show you the small kinds of changes you can make to any process to tailor it to your own preferences, and
- Provide concrete evidence that there’s no one right or best way to do anything. The right answer for YOU is what works best for YOU.
The big picture
My overall process isn’t all that different from Kathy’s. We both work in passes: one to get all the threads attached to the front apron rod, one to fine tune the tension. We both use half surgeon’s knots to attach the warp to the rod – though I’ve always thought that was the entire surgeon’s knot and only learned by reading Kathy’s blog post last week that a surgeon’s knot normally has a second half!
The differences between our practices are in the details: how we set up, the size of our knots, how we tension them as we go, and the way we finish off the knots before starting to weave.
I’m a knot Goldilocks
I’m picky about my knots: I want them all the same size, and I don’t want them too big or too small.
For me, an inch wide is too big. When knots are that big, the gaps between them are also big, so it takes more effort and yarn to spread the warp and fill in the gaps. Similarly, half an inch is too small. It takes too much effort to tie that many knots, the spaces are too hard to get my fingers into, and the more individual knots I have, the harder it is to get the tension even on each one.
For me, 3/4” or thereabouts is the sweet spot for knot size, though I don’t go by inches but by the number of dents. If I’m using an 8 DPI reed, I usually put six dents’ worth of threads into each knot. If I’m using a 10 DPI reed, I put 8 dents’ worth into each knot, and if I’m using a 12 I put either 8 or 10 dents in, depending on which number works into the total number of ends best.
My example warp was sleyed in an eight dent reed, so I put six dents’ worth of threads into each knot.
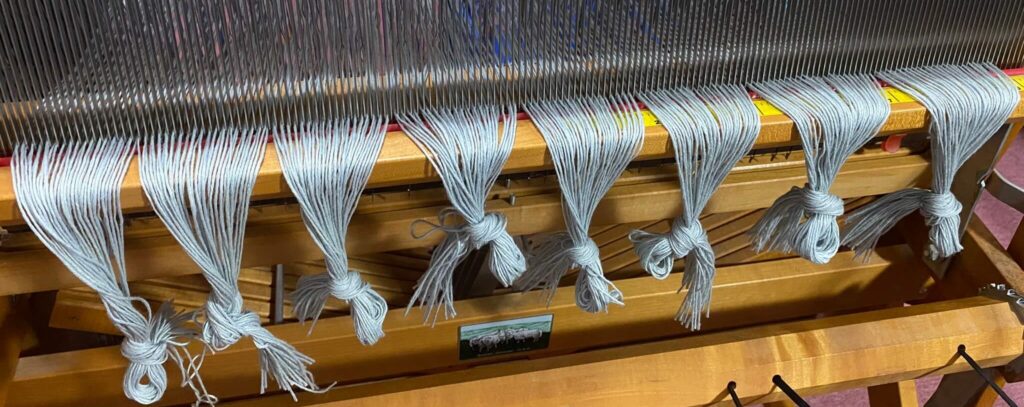
Set up: Organize the bouts
I like to get my threads grouped into knot-sized bundles before I actually start tying onto the rod. This lets me make sure the knot size I’ve decided on will work evenly into the total number of ends (or close to it), and also lets me figure out what to do at the center when I start tying onto the rod.
I start at the outside and tie each knot’s worth of threads into bundles with slip knots, working towards the middle of the warp.
Chances are that the total number of dents in my warp isn’t an exact multiple of my knot size, so I’ll have at least one bundle that’s an odd size. By working from the outside in, I make sure the odd size bundles are in the middle of the warp rather than at the selvage. I like to keep the selvages as regular and trouble free as possible!
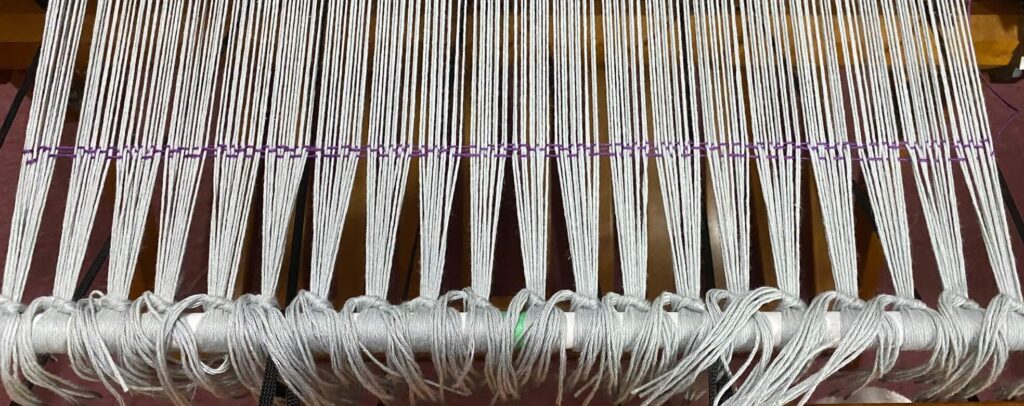
At this point I had nine equal sized bundles on either side of center, with 10 dents left over in the middle:
That meant my last two bundles couldn’t both be six dents like the rest; I make them 5 dents each instead, which is pretty close. If I’d been left with only a few threads in the middle, I’d have worked them into the bundles to either side as evenly as possible.
Whatever happens in the middle, I try to work the oddball ends into the center three or four bundles as evenly as possible. Sometimes that means that the very middle bundle is the normal size but its neighbours are a little bigger or smaller. Whatever gets me nearly even groups and spaces the oddballs symmetrically around the middle is good enough for me.
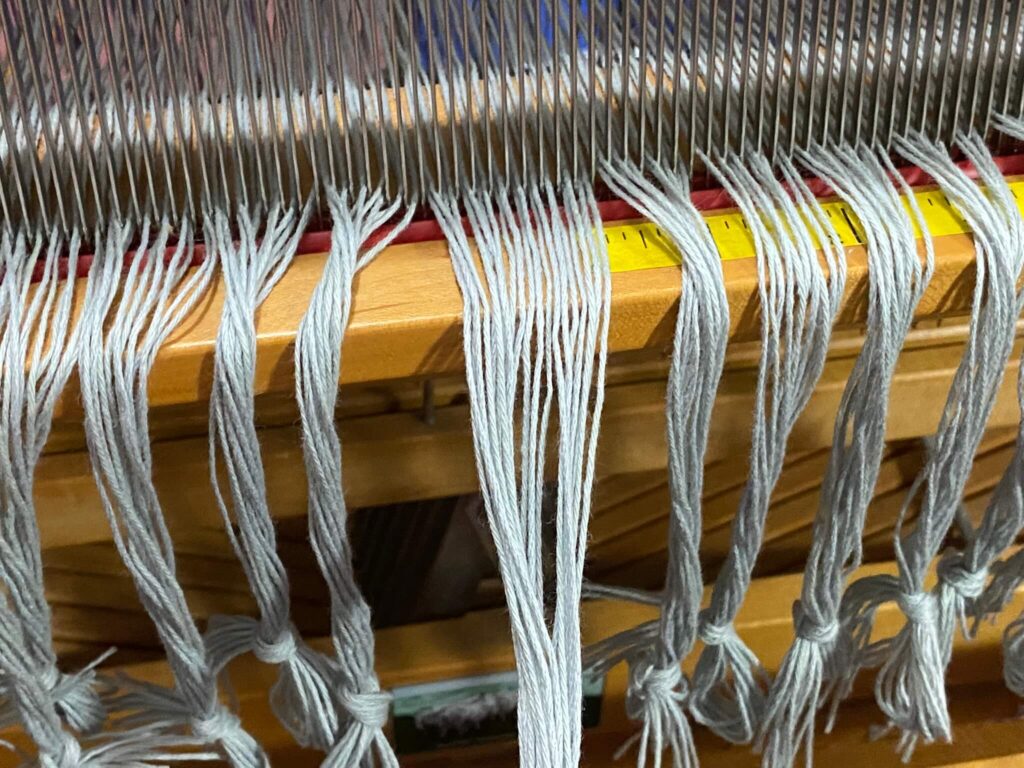
Pass #1: Tying onto the rod
Once my bundles are organized, as equal in size as possible, and symmetrical where they can’t be equal, I’m ready to tie onto the rod.
I use exactly the same half surgeon’s knot that Kathy described in her blog post. It’s like the first step of tying your shoes, except that you put the tip of the shoelace through the inverted ⋀ two times instead of just once before pulling it tight. Have a look at Kathy’s pictures – they show this really clearly. The only thing I’d add is that I always make sure that the threads don’t twist between the reed and the apron rod. If they twist, it’s harder to feel if the tension is even and the weft can’t beat in evenly either.
Like Kathy, I usually start tying onto the rod at the center. I’ve got the center of my apron rod marked, which means I can tie the center bundles of warp ends right in the middle of the rod – no need to worry that the rod will stick out too far to the left or right and get caught up in the ratchet or hook on the side of the loom!
Getting my bundles organized in advance tells me whether I’ve got a single knot in the middle of the warp, which needs to be tied right smack on top of the mark, or two knots in the middle that should be tied one to either side of the mark.
In this case, I had two knots at the center, so I tied one to either side of the mark. (These are the two oddball knots that are a little smaller than the rest; that doesn’t hurt anything since they’re nearly the same size.)
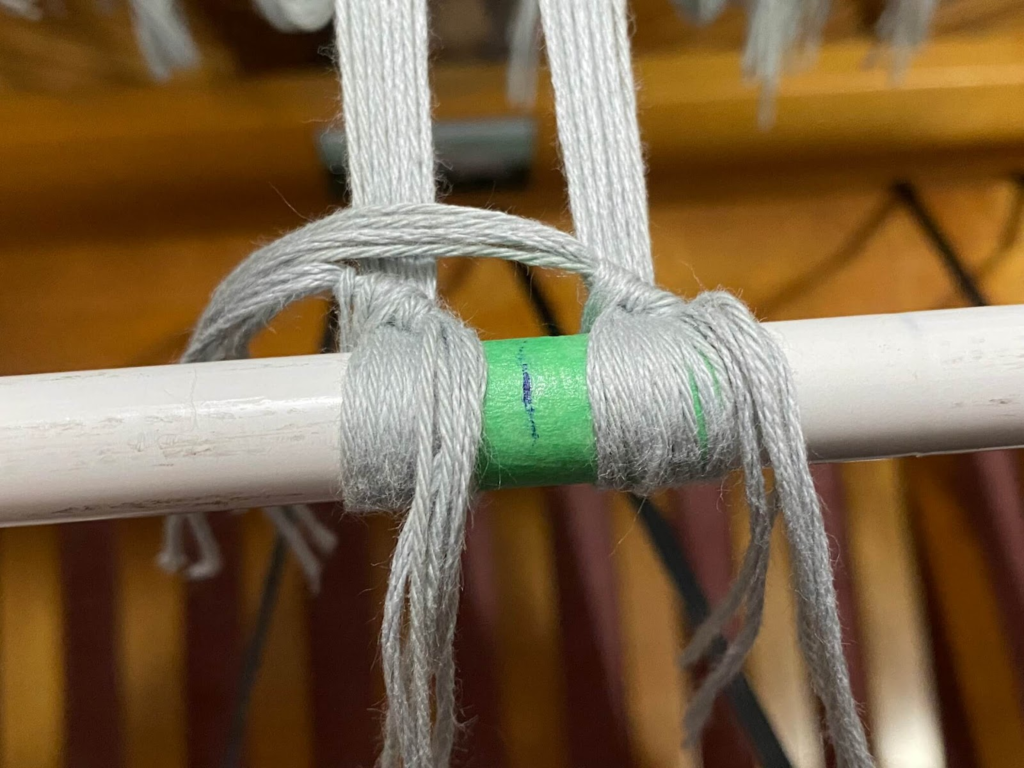
I put a fair bit of tension on the threads when I tie each knot, since it’s tension and friction that keeps a surgeon’s knot from coming apart. I don’t pull them super tight but I pull out all the slack.
Once the center knots are tied, I alternate from side to side, working from the middle out, until I’ve got five or six inches of warp tied on in the middle. Then I check how tight the tension is getting.
I add tension as I go
By the time the first five or six inches of warp are tied on, the first knots at the very center of the warp usually feel just a bit looser than the knots I tied last. If most recent groups are significantly tighter, I wiggle the threads in the new knots to loosen them up and even things out. Otherwise, once I notice that the outside groups are starting to get tighter than the inside groups, I tighten the warp by turning the cloth beam by one tooth on the ratchet.
Here’s the first point at which I first tightened this warp:

As you add more and more knots to the apron rod, its weight is being supported by more warp ends, so there’s less resistance to the tension you’re putting on each new group of threads. As a result, the new groups of threads tend to get tighter and tighter relative to the first groups as you go, and the original groups are looser and looser by comparison.
Tightening the already tied on warp every 5 or 6 inches counteracts this, so that all of your threads are closer to the same tension all the way across and less adjusting is necessary later.
This warp was wide enough that I tightened it a second time before I got to the selvages:

Pass #2 (if needed): Fine tune the tension
At this point, all my warp ends are tied onto the apron rod with half surgeon’s knots:
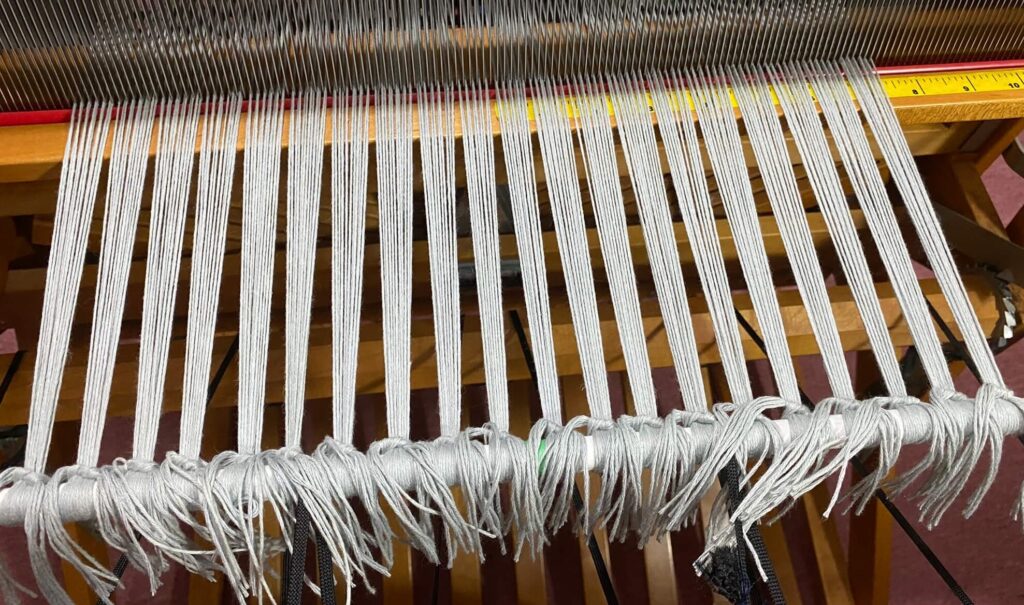
The last pass is when I fine tune the tension to even out any tight or loose spots – if that’s even necessary.
If I make all the knots the same way, and make them all the same size, and remember to tighten up the already-tied-on-warp every five or six inches, then I often don’t have to adjust the tension at all after the first pass.
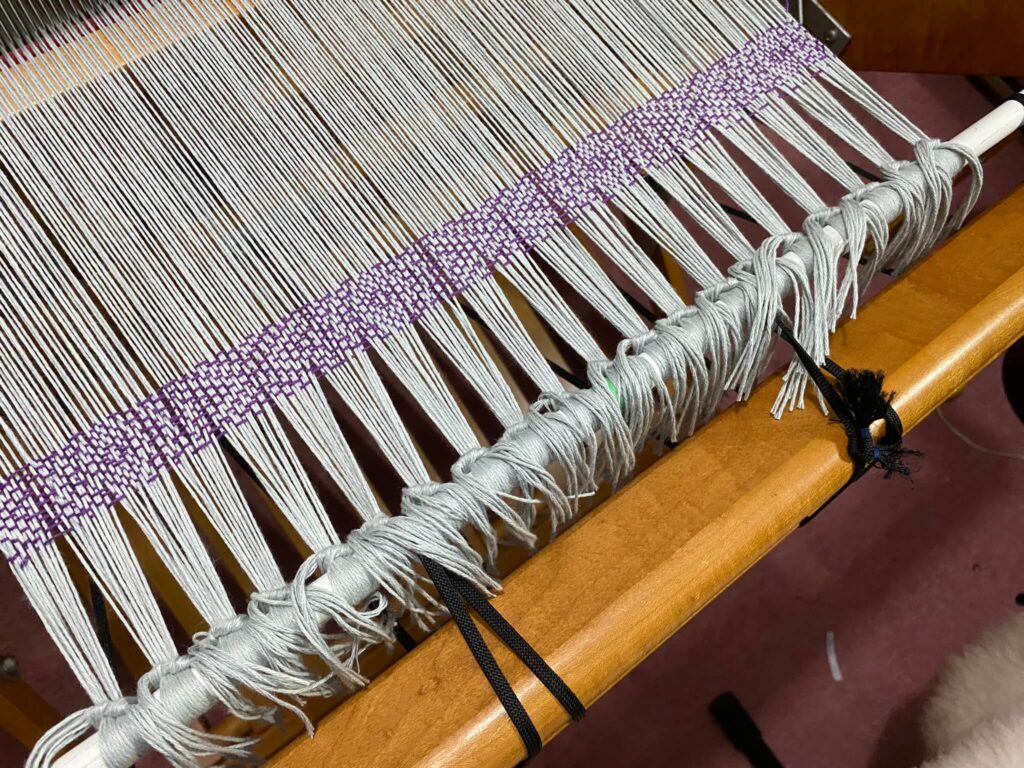
Here’s my example warp after Pass #1, before I made any adjustments to the tension:
As you can see from the header, the fell is straight, which means the tension is even. I didn’t adjust any of the knots at all and my tension is already good to go. That isn’t always the case but it’s nice when it happens!
Testing the tension
If a group of threads is loose, I pull the tails of its knot toward the beater to pull out the slack, then tighten up the knot like Kathy described in her post.
If a group of threads is a little tight, I pinch the whole group of threads and wiggle them hard to ease some slack through the surgeon’s knots and into the bout. That usually does the trick. If a group of threads is very tight, then I release the knot like Kathy described and retie it again.
No second half of knots (usually)
I rarely “complete” my surgeon’s knots with a second half. Adding a second half to the knots adds bulk I don’t like and can even create big knobs which can distort the tension when the cloth wraps around the cloth beam. As long as there’s tension on the warp, the half surgeon’s knots usually won’t slip or come undone on their own.
Two times when I DO tie a second half to the surgeon’s knot are when the threads are really slippery and the knot won’t hold on its own, or when I’m tying onto a square rod like the ones that come with a Schacht Baby Wolf. For some reason, the knots tend to let go on a square rod when it passes over the cloth beam. (This is why I’m not using the Schacht square rod on my Baby Wolf in the pictures above!)
In cases when I do tie the second half of the surgeon’s knot, I tie it as a square knot, not a slip knot, to keep the bulk down. Since that won’t be as easy to remove, I don’t tie the second half until I’ve tested my threading to make sure I don’t have any crossed threads or threading mistakes.
Usually I tie just the first half of the knots, fine tune the tension, and then weave for a few inches to make sure the tension is even and everything is copacetic. When I need to advance for the first time, or when the apron rod comes close to going around the front beam, I judge whether the knots seem secure or are slipping and decide whether to add the second half of the knot. I usually don’t!
This warp is tied on and ready to weave, without any second half of the knots:
Feel free to compare the method you use, to the methods that Kathy and I use. We love to hear the different ways that work best for other weavers!