
When a twill’s floats are too long, the solution is to change the float lengths in its tie-up.
“But tie-ups don’t have floats!” you say? You’re quite right: a tie-up doesn’t have actual floats. A tie-up is the connections between the shafts and treadles that make the sheds required while weaving, and those connections don’t “float” anywhere.
Even so, the number and placement of those connections directly controls how long floats are in a twill fabric.
What’s a “tie-up float”?
The “floats” in a twill tie-up are the numbers in its ratio, and the “length” of those floats is the value of the the numbers. Which is to say, a tie-up with a ratio of 3/1/1/3 has four floats, and those floats have a length of 3, of 1, of 1, and of 3 respectively.
Why call these “floats” instead of just “numbers in the ratio”? Because the numbers in a twill tie-up’s ratio dictate exactly how long the warp and weft floats will be in a twill fabric created by pairing that tie-up with a straight threading and treadling, and at least how long the floats will be when the tie-up is paired with other threadings and treadlings.
Knowing this lets you tell at a glance how long the floats in your twill fabric will be – at least in the areas where the threading and treadling are both straight draw – and thinking of them as floats makes it a lot easier to figure out how to fix floats that are too long.
Weft float length
To see why this is true, let’s look at weft floats first.
Consider three facts:
Fact #1: The numbers in a tie-up ratio indicate how many neighboring shafts are raised or lowered at a time.
Fact #2: When the warp is threaded in straight draw, the warp ends are threaded on the shafts in order. Lifting or lowering neighboring shafts will therefore lift and lower neighboring warp ends.
Fact #3: Lifting and lowering neighboring warp ends means the weft will float under or over all those ends, creating a float equal in length to the number of shafts lifted or lowered side by side… which was the number from the tie-up ratio.
Therefore, even though the numbers in a tie-up ratio aren’t technically referring to floats, they still describe exactly the weft float lengths you get when you combine that tie-up with straight draw. They also describe the order in which those floats appear in the fabric.
Warp float length
A tie-up ratio doesn’t just describe the columns of a tie-up. It also describes the rows.
When taken column by column, the ratio tells us what pattern of shafts is raised on each individual pick. When taken row by row, the ratio tells us what each individual shaft is doing for a whole series of picks.
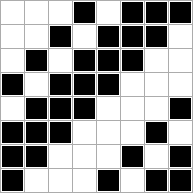
Take this tie-up and the little bit of straight treadling:
Look at just Shaft 8, for instance. Its row in the tie-up looks like this:

Note that the pattern of this row has the same 3/1/1/3 ratio as the first column. Every row of the tie-up has the same ratio, though it’s rotated from one row to the next. Every column does, too.
Getting back to Shaft 8, where does it go when Treadle 1 is stepped on? Treadle 2? Treadle 3?
Treadle 1 → Shaft 8 stays down
Treadle 2 → Shaft 8 stays down
Treadle 3 → Shaft 8 stays down
Treadle 4 → Shaft 8 goes up
Treadle 5 → Shaft 8 stays down
Treadle 6 → Shaft 8 goes up
Treadle 7 → Shaft 8 goes up
Treadle 8 → Shaft 8 goes up
When a shaft stays down for several picks in a row, as Shaft 8 does for the first three picks above, the threads on that shaft stay down and therefore float under the cloth for that whole distance without interlacing. When a shaft stays up for several picks in a row, the threads on that shaft float over the cloth without interlacing for that whole distance.
So, like before:
Fact #1: Shafts staying down or staying up on successive picks create warp floats.
Fact #2: The numbers in a tie-up ratio indicate how long a particular shaft stays up or down when the treadles are stepped on in order (i.e. a straight treadling).
Face #3: Therefore, the warp floats in a twill fabric woven with a straight treadling are equal in length to the numbers from the tie-up ratio.
Once again, the numbers in a tie-up ratio describe the warp float lengths you get when you combine that tie-up with straight treadling, and also the order in which those floats appear.
What about when it’s not straight draw?
A twill tie-up ratio tells us exactly how long the floats will be when the tie-up is paired with straight draw.
When paired with some other threading used for twills, it tells us at least how long the floats will be.
Consider this draft:
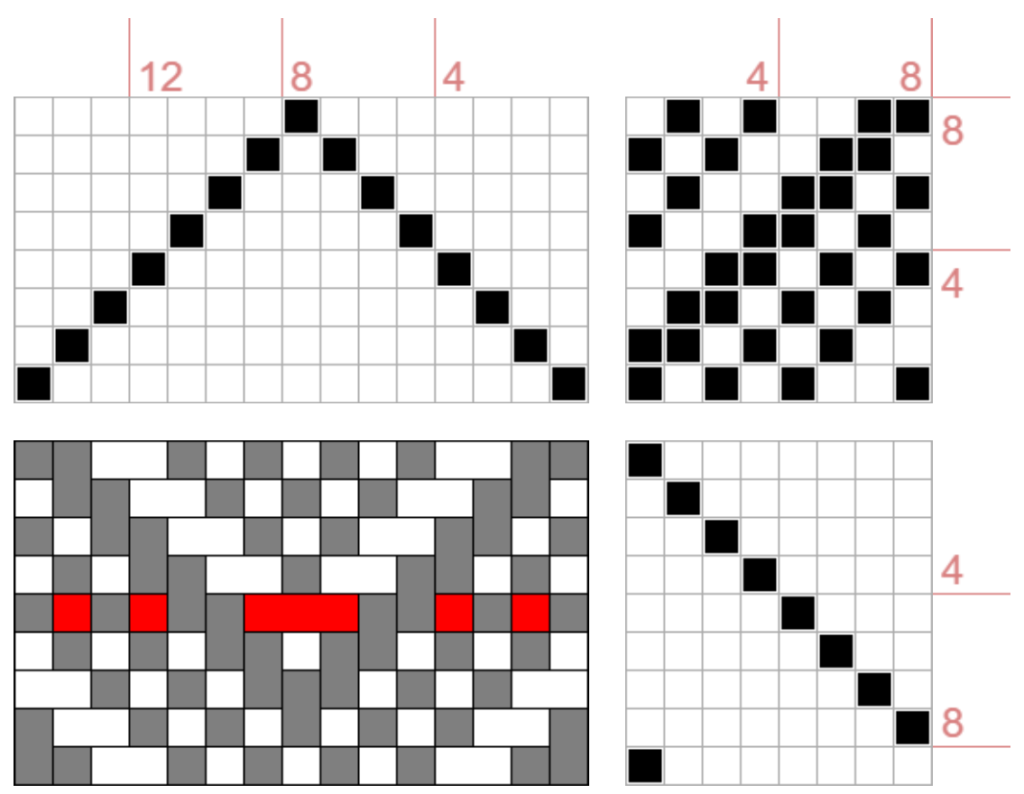
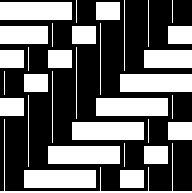
The peak of this threading is 7-8-7. Even if the tie-up ratio has no numbers bigger than two, that means that Shafts 7 and 8 will go up or stay down together at least once in each twill treadling repeat, and therefore the weft will float under or over three neighboring ends. (The red weft thread floats over both shafts. There’s a spot on the back where another pick floats under them all.)
If the tie-up ratio has a 3 in it, there will be at least one point at which Shafts 6, 7, and 8 go up or stay down together, producing a weft float of five neighboring ends.
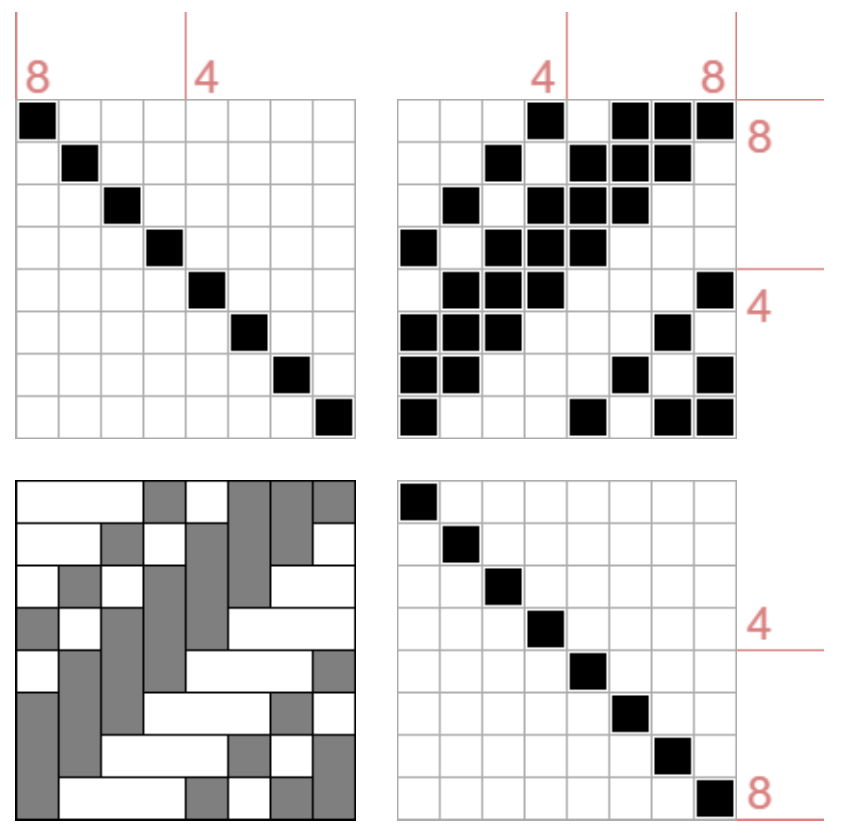
Consider this draft:
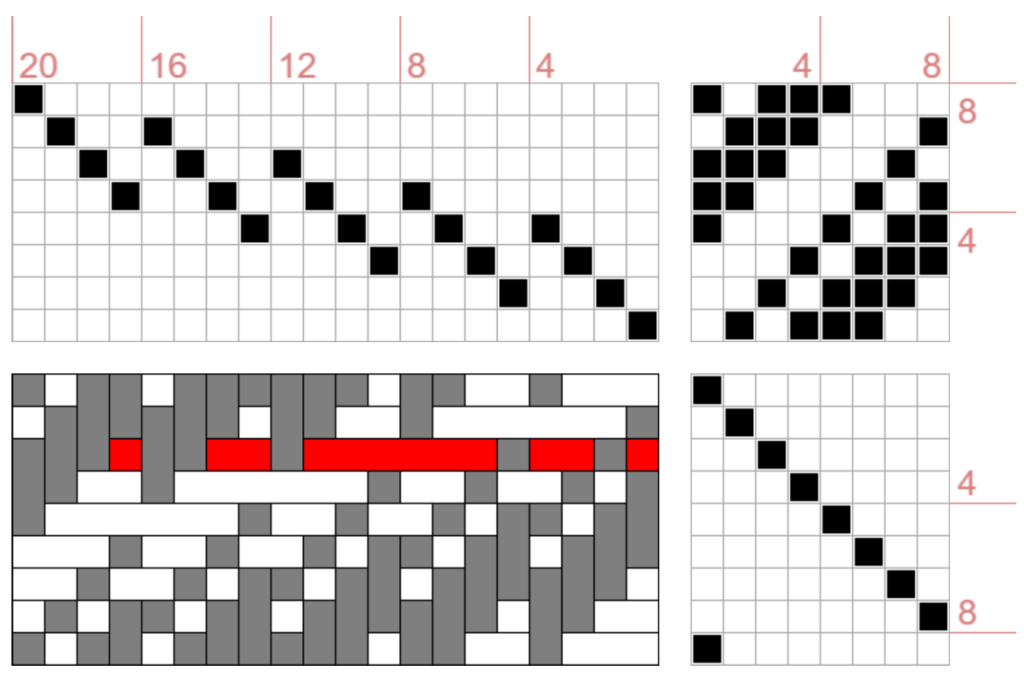
There’s a spot in this threading that goes 3-4-5-3-4-5. Since the tie-up has a ratio with one or more 3s in it, that means there’s at least one point where the weft floats over all six of those threads at once.
When paired with something other than straight draw, the tie-up ratio tells us at least how long the weft floats will be. They may be longer.
When paired with something other than a straight treadling, the tie-up ratio tells us at least how long the warp floats will be. They may be longer.
Floats by inspection
Since the diagram of a tie-up is just another way of representing its ratio, you can tell simply by glancing at the tie-up how long the floats in the cloth will be if it’s paired with both straight threading and straight treadling.

⇒
When the tie-up is paired with something other than straight draw and a straight threading, you can still tell by inspection at least how long the warp and weft floats will be, though they may be longer.
Managing float length
The corollary to all this is that you can manage the lengths of floats in the cloth by managing the length of “floats” in the tie-up.
Are the floats in your twill fabric too long? Replace bigger numbers in your tie-up ratio with smaller ones. In other words, change the tie-up so that bands of solid white or solid black are narrower. If your threading and treadling are both straight, simply decide how long you’re willing to let floats be and make sure none of the numbers in the tie-up ratio are any bigger (longer) than that.
When the threading and/or treadling is not straight, the bands in your tie-up might need to be narrower yet. How much narrower will depend on the height of any points or overlapping parts of your threading or treadling, but the principle is the same: making the bands of black and white in the tie-up – that is, shorter “tie-up floats” – will reduce the length of floats in the fabric, too.

If you want to know more about tie ups and designing with them, you might like these classes in The Handweaving Academy: Drafts: The Written Language of Weaving and Designing in the tie-up: Cookies and Clocks.