Last week, I explained my dye process and showed the warp I’ll be working with.
This week I beamed the warp, so follow along with me and learn:
- How I think through arranging my painted-warp chains
- How to beam without a cross (if your bouts are small enough)
- Tips for beaming
- How to get out those pesky warp tangles
First I needed to decide what order I wanted the chains in. Because I “winged it” for this warp, without much planning, I did not take the time to label the chains in a specific order before dyeing them. I was aiming for a random look, which meant no clear “pattern” for the chains.
(If I had been handpainting the chains with lines, swirls, or other patterns that I wanted to keep more or less intact in the final warp, I would have laid out and labeled the chains in sequential order, painted and rinsed out the chains, then put them on the loom in the original order.
I had a few choices for the order of my chains:
- I could simply beam the chains in random order, using whatever chain I grabbed first. This would be the easiest method, but would also give me the least control over the finished design.
- I could lay them out in some order that pleases me, without unchaining the chains. This would not show me the final arrangement of colors,, but would give an general idea of how the final warp would look.
- I could unchain each chain, lay them out along the hallway outside my studio, and move them around until I was happy with the look.
I have a bit of a rebellious streak, so of course I didn’t choose just one method. I went with a hybrid of options 2 and 3.
I laid the chains out on the studio floor, to get an idea of how the colours flowed between them.
Here is what the first round looked like:
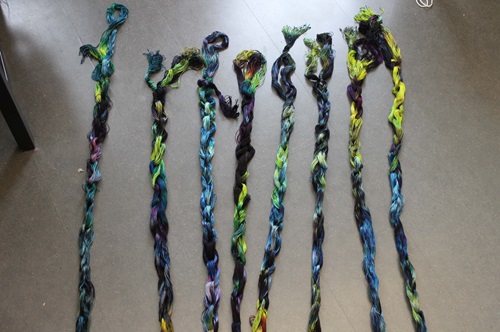
And here was what I thought of it:
The “tops” of the chains have some of that lovely yellow-green, but the third from the left doesn’t have much of it – it leans more turquoise, and is lighter in value than the other chains. A few of the chains, especially the two on far left, are on the darker side.
I want that yellow-green section in most of the chains to blend together, and move across the warp in something more free-flowing and dynamic than a horizontal stripe.OK, let’s move them around.
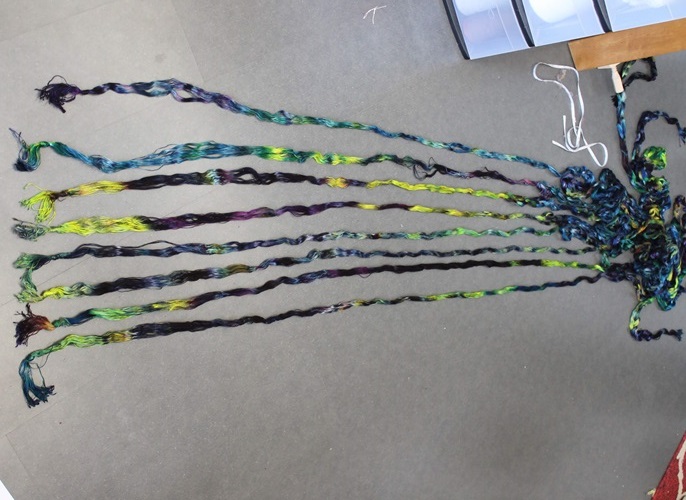
After a bit of playing, I had this:

Next, I partially unchained some of the chains, just to make sure I was happy with the overall progression of the colours. I also flipped some of the chains end for end, partially unchaining them from that end as well..
SCREEEEECH! In come the weaving police, saying, “But wait!! What about the cross? Didn’t you put a cross on either end? You NEED that to beam your warp, silly!”
Rest easy, O Weaving Police. I have a method to my ….well…..method. (You’ll hear about it in a moment.)
I thought a little about my process, rather than simply arranging chains at random:
Even though I am carefully arranging the start of the chains, I don’t know how the REST of the chains will look.
I COULD unchain them all, lay them down in the hallway outside my studio, and fuss with the order until happy. I could also slide the chains around to make the colours line up exactly as I want them.
I eventually decided that making the first part look nice was enough for me, and to embrace the unknown for the rest of the warp.
Once I got the chains in an order I was happy with, I got ready to beam.
I made sure that I had everything I needed: my threading/sleying hook, painters tape, a pencil (or pen), scissors, etc. I put them where I could easily reach them. (I also put a water bottle close by, because beaming can be thirsty work!)

I made sure that I put a piece of painters tape on my table. It might look odd, but painter’s tape is a great place to make notes about things that come up while I am beaming, and because it is stuck to the table, I can’t lose it. (Very important!) It also peels off easily, without leaving residue when I am done.
Finally, I was ready to start beaming.
What’s that? Do I hear the Weaving Police yammering on about that cross?
Okay, I’ll explain….
- I did not put a cross into these chains when I measured out the warp, because these chains have relatively few ends – in this case, just 48. A small number of ends can only get SO tangled – unless I deliberately try to tangle them, or allow kids, pets, or other gremlins to play with them.
- I use my tension box when I beam chains, and the ends will be going through not one, but two sections of reed on the tension box. This will help sort out any threads that are crossing over their neighbours.
- At roughly 9 yards in length, these chains are (for me) not particularly long, and I know that even if they tangle horribly, I will be able to get to the end of the chain without needing to swear, google “how to calm down when your warp misbehaves”, or resist the temptation to get my scissors out.
- I have a secret weapon against tangles, which I will show you later on.
I try to beam my sectional warps all in one session, as I find that I achieve more consistent tension across the warp that way.
I wasn’t sure whether I would have the time to get this entire warp beamed in one session. So when I beamed the first section, I planned to count the rotations of the beam as I went. Because I had measured all the chains to the same length (cross fingers and hope!!), if I put them on with the same number of rotations, they would all be wound with the same tension (or close enough for my purposes).

Now and then, the threads move around, and get tangled up with each other. Here is how I deal with tangles.
First, I put some tension on the section between my hand and the tension box. Then I will give that section a little “snap”, that is, I lift my wrist like I am flipping a pancake, and when my wrist comes down, I give the warp a tug. This gives the ends some slack to move into their correct place, and the tug should get all the ends lined up in tidy order. When doing this, I always hold the sectional beam in place with my hand – otherwise it will turn the wrong way and unwind the section I am working on.
If the snap doesn’t put things into order, I will keep tension on the section, then strum the warp with my hand, like strumming the strings of a guitar.
If THAT doesn’t sort he tangles out…I pull out the big guns.
Cue ominous music…
The TANGLE TEASER

There are weavers whose #1 rule of weaving is NEVER BRUSH A WARP.
Obviously, I am not one of them.
The common belief is that brushing a warp will push the tangle further down the warp, causing larger tangles further down the line. This is true, but I think that this advice is somewhat outdated, coming from a time when Tangle Teaser brushes didn’t exist.
These brushes, meant to gently untangle hair with a minimum of hair-pulling and frustration, work just as well when used on warps (and weavers!).
Here is a photo of a warp that had some tangles that did not respond to my “snap and strum” approach. The tangles weren’t terrible, but they were there, and they needed to be dealt with, to avoid broken ends in the warp.

This is the same section, after I stroked the tangle teaser through it a few times.


Now you can see that the tangles have moved along the warp, which is not ideal, but also, the portion of the warp that is about to go through the tension box is now tangle free, which was the immediate goal.
Let’s look at what the end of the section looks like, after I continued to brush the tangles along the section while beaming the section:
Now at the end of the section, I had a couple of choices. I could pull the threads from the tangle individually, which will eventually get me an untangled warp. Or I could take the easy way out, and use the Tangle Teaser a few times.
Go, Tangle Teaser!

And voila! I now have an untangled section.
This method can also be used on most warps, even those going on plain beams. I recommend you do your best to avoid tangles in the first place, because that is the fastest and easiest way to beam a warp. BUT if disaster strikes, and you come across a tangle that tempts you to throw your warp out the window, the Tangle Teaser can save the day.
I am in LOVE with the colours and patterns that emerged as I beamed the warp:

I now have it beamed, and this week I will be choosing the draft, threading/sleying the warp, and testing some weft options.
I can’t wait to share it with you!