
Have you ever seen a piece of weaving with a lovely border, then looked at the border more closely and discovered it was simple plain weave? Did you wonder why the weaver chose to add that border?
The weaver may like the neat, ordered look of a plain weave border. Possibly they were looking to tidy up their selvedges on a weave that has inconsistent floats at the selvedge. They might be like me, and prefer not to use floating selvedges, or maybe it was a combination of these things.
No matter what the reason, here are some of my notes about how I go about deciding IF I want to add plain weave borders to my warp, and if I do, how I make it happen.
Let’s talk about the IF first, because if the answer to that is no, then how is irrelevant.
Why do you want to add a plain weave selvedge to your warp? Personally, I either want to have borders that mix the colours of the warp and weft, or I want lovely sharp selvedges (Which, for me, are easier to achieve with plain or half basket weave borders. We will talk about half basket weave in another post). I may also be avoiding the use of floating selvedges, which are a great tool, but not my favourite one to use.
The choices that I make will largely depend on the structure of the main body of my project. If my fabric is going to be woven in a twill or similar structure, with minimal plain weave within it, I will generally not choose plain weave, because there is likely to be a difference in the take-up of the twill portion and the plain weave portion. This, in turn, can cause issues with the tension of my warp, which is likely to cause me some frustration. (Janet goes into the details of the “why” of this in the lesson Designing with drawdowns in the course Drawdowns, Part 1.) In short, if my project is a twill, or twill-like weave, I will choose a border that is not plain weave. We will talk about that in another post.
Let’s assume that I am working on a project that has significant portions of plain weave, and I have decided that I want to add a plain weave border to it.
NOTE: This method may or may not work for structures that have supplemental wefts, like overshot or summer and winter.
This draft is a lovely skip weave (sometimes called a float weave), but that has floats that reach around the selvedge which can result in selvedges that look a little “mouse bitten”.
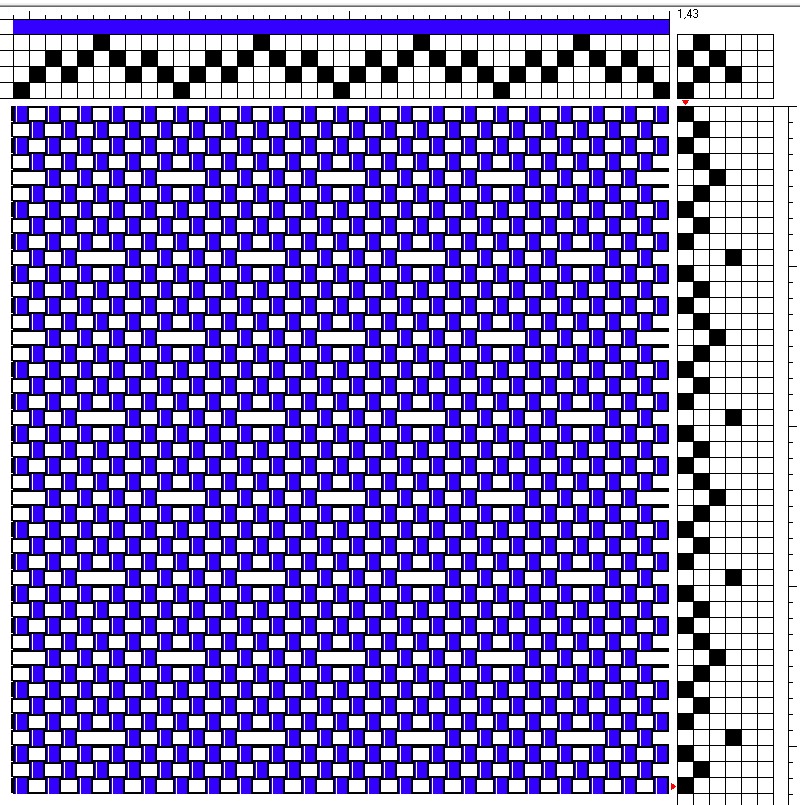
You can see that it already has large areas of plain weave within it, so it seems like it should be a snap to slap a few extra ends on either side of the warp and get plain weave.
The funny thing is that it IS that easy, but you do need to take a closer look at the threading, tie up, and treadling to achieve plain weave.
If you follow each WARP thread, you will see that the warp ends that create plain weave are those that are threaded on shafts 2 and 3.

So if I want to have a plain weave border at the selvedge, I need to add some threads that are threaded alternately on shafts 2 and 3.
So let’s look at that:
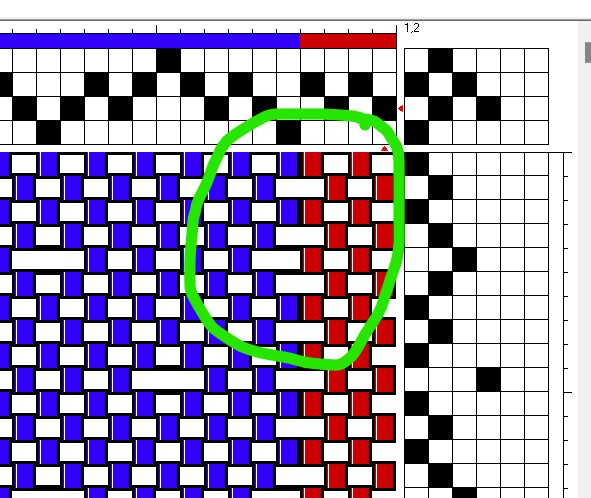
Oh no! When we do that, we end up with a strange line of two end floats that does not look consistent with the rest of the pattern. Why is that?
If you look closely, you can see that the threading read right to left is 2-3-2-3–1-2-3-2. Do you see that, where the new red border meets the original blue part of the threading, there are two warp ends that travel together a lot of the time? That is what is causing the skips.
To fix it, all we need to do is switch Shafts 2 and 3 in our border. If we alter that threading to 3-2-3-2–1-2-3-2, we get a plain weave border that merges properly into the rest of the fabric.

We could have also just added another 2 or removed the final 3 where red meets blue. In fact, we can create a border that is whatever width we like just by adding more and more ends on Shafts 2 and 3.
In summary, if you would like to add a plain weave border, inspect warp ends in your drawdown. Look for a warp end that travels over and under the weft ends in the familiar “over one, under one” pattern of plain weave. If you find one, then look for a second one that travels over and under the weft in the opposite order. That is to say, if the first end you find that looks like plain weave goes over/under, you need to find a second one that goes under/over those same weft threads.
If you find these two ends you can thread your border ends alternating those two shafts, and you will get a plain weave border.
I hope that you find this useful, I look forward to sharing some other methods for adding borders with you in the future.

From the Course Catalog:
Drawdowns, Part 1 – Learn how to analyze a draft, and use that information when designing a fabric and planning a project.
From the course Drawdowns, Part 1:
Designing with drawdowns – Learn to use a drawdown to determine how the fabric will behave during and after weaving.