
This post was graciously written by community member Laura Fry, master weaver, teacher and author of Magic in the Water
Threading the loom ergonomically
Threading is something that people find difficult. I used to thread the loom using the ‘standard’ hook that was commonly available. I got pretty good at threading and didn’t think too much about it until I saw Norman Kennedy threading with a completely different approach.
He was using a smaller, shorter hook, held like a pencil with the hook facing downwards, and using very small movements to thread multiple ends at once. I immediately bought the hook and when I got home practiced using it the way I had seen him do it.
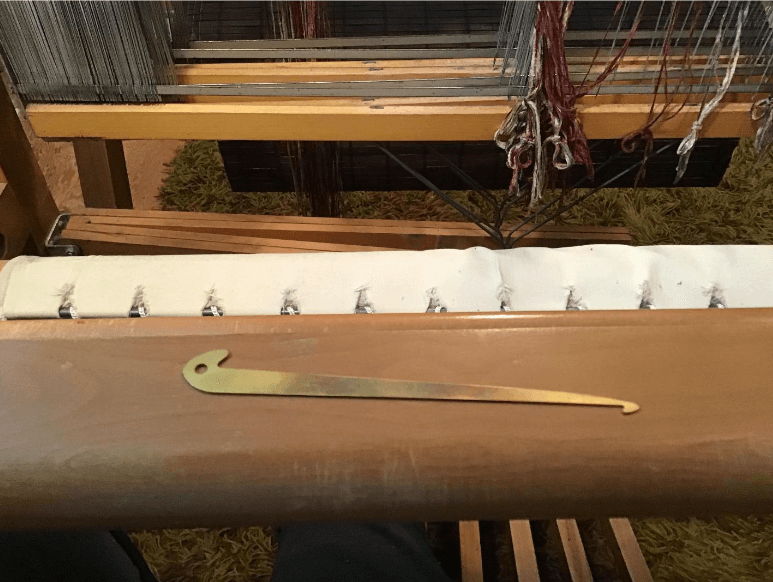
The image to the left shows a Harrisville brass threading and sleying hook. Once in my hand it does not get put down (unless I drop something) instead it gets pinched between my thumb and index finger which means I can use my hand to help select heddles and get the next set of threads positioned in my left hand – all without putting the hook down.
I was already holding multiple ends in my left hand (non-dominant) and it was a fairly simple matter to begin threading those ends through their respective heddles, then pulling all of them through at the same time. Small movements to thread 4 or 6 or 8 threads, then one large movement to pull them all through the heddles, tie a slip knot in the group, set up the heddles for the next bunch and repeat.
My productivity doubled. Eventually. I give myself at least 7 warps to practice a new method because it can take that long to make the new method the ‘default’.
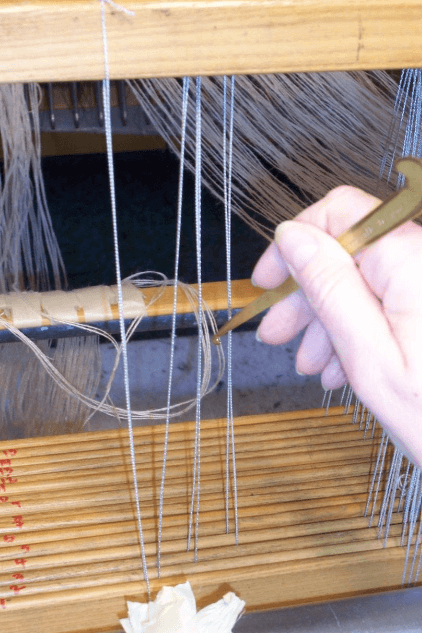
This photo shows the heddles set out in their order and the hook held like a pencil. My left hand holds the ends and supports each heddle as I thread it, storing the loop on the shaft of the hook until all are in their respective heddles. Then the entire group is pulled forward and slip knotted together.
A simpler method is to just thread one end at a time rather than to store the loops on the shank of the hook. This approach is useful for threads that are highly textured, but can be used generally if the previous method is too awkward. Keep the warp ends short enough that a flick of the wrist will carry the yarn through the heddle eye, then collect the group when they are threaded and tie a slip knot.
Different looms are of different heights and may be adjustable to make threading easier. Some looms can have their breast beam removed, some can have their cloth beam removed and the beater taken out to give full access to the shafts.
Some are taller or shorter. Find a height of stool that gets you as close as possible to the heddles being at eye level. Some looms allow for the shafts to be raised, one way or another.
Sometimes, the loom just isn’t a good fit for the weaver.
Whatever you do, don’t sit crouched in front of the loom for more than about 45 minutes. The position is bound to be awkward, and it’s a good idea to get up, move around, swing your arms to loosen your shoulders, walk to loosen your hips. Do something that requires different muscles to give your body a rest.
Above all, make sure you have good lighting. I have task lamps I can set up and adjust as I move across the width of the loom. In the above photo you can see that I have numbered the shafts. With 16 shafts, it helps me keep track of my threading more easily if I can see the number of the shaft I need to set up the heddle progression.
Last, but not least, I have a typist’s clipboard where I can place my threading draft for close consultation. As I have gotten older and my sight isn’t as good as it used to be, I am now printing out my drafts in a larger font than previously. As I thread each group, I mark them off on the printout. I am hoping the larger font will reduce the threading errors. Much better to not make them in the first place, then need to fix them later!
From the Weavers Toolbox: