
Have you ever heard someone say “I walked the treadles”, or “I use a walking treadle order”?
This may sound strange or confusing, but it’s actually a very practical method for making treadling easier.
A “walking treadle order” is a treadling pattern where the weaver uses their feet in an alternating fashion, as if they were walking.
As in ACTUAL walking, you can start with either foot, although when walking the treadles, the foot you start with is generally planned out.
Why in the world would you want to change a perfectly lovely treadling?
Well, there are a few benefits to using a walking treadle order. One is that alternating your feet is an ergonomically sound choice. Doing so uses alternating sides of the body, which balances muscle use more evenly. You might not think this is a big deal, but if you have ever treadled something that uses primarily one foot, you will KNOW that it matters!
Another reason to walk the treadles is that I find it easier to keep track of where I am in the treadling order, without marking papers, putting pins/marks/sticky notes somewhere. I simply walk one entire repeat, and don’t stop until that repeat is done.
One more benefit from a walking order is that I can keep track of where my shuttle is supposed to be. My personal preference is to throw the shuttle TOWARD the treadle that is pressed down. I prefer to make my first throw from right to left, which means that I also like to use my left foot to press the first treadle. Now this might not seem like a big deal, but it means that I always know exactly where I ended off, and where I need to start up again, no matter how long it has been since I was last at the loom.
Now that you know some reasons WHY you might want to walk the treadles, let’s find out HOW to alter a draft to achieve that.
I promise that it isn’t as hard as it seems!
Here is a simple draft:
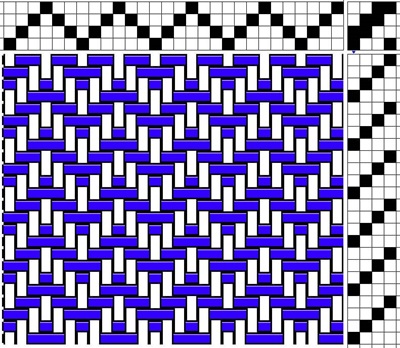
Let’s look at the tie up and treadling:
This treadling order has a repeat length of 4. In order to convert a treadling to a walking treadling order, the repeat length MUST be equal to, or less than the number of treadles you have available to you. In addition, walking the treadles is easier if the length of the repeat is an even number.
Let’s assume you have a 4 shaft loom with 6 treadles. If the treadling repeat length is 2, 3, 4, 5 or 6, you can convert it to a walking order. If the treadling repeat length is 7, you would not be able to convert it.
Let’s assume that we are going to use the inner four treadles, and leave out the far left and far right treadle.
Many weavers will have a “Default” of numbering the treadles they are using, starting at 1, from left to right. We are going to rename the treadles, for clarity.
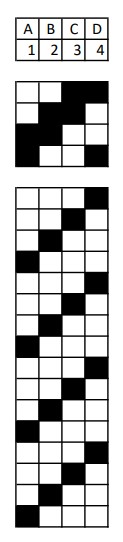
So the ACTUAL treadles are now named A, B, C, and D, from left to right.
A and B will be treadled with the weavers left foot, C and D with the right.
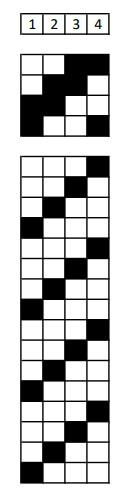
The TREADLING TIE UPS are the columns that show what shafts are tied together, and where in the treadling order that treadle is to be used.
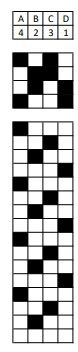
Here is the draft again, with the Treadles (A through D), and the Treadling Tie ups (1 through 4) marked. Tie up 1 would be used on Treadle A, Tie up 2 on Treadle B, Tie up 3 on Treadle C, and Tie up 4 on Treadle D.
The weaver would push Treadles D, C, B, and A, in that order, and repeat, if they were following this treadling diagram.
Now, let’s break this diagram into individual Treadle Tie ups.
(if you want to get your craft on, you could print out the treadle tie up order, cut each column apart, then move the strips of paper around however you like)

I personally prefer to walk the treadles from left to right, starting with my left foot. (Of course, you can choose whatever order suits you.)
So THAT means that:
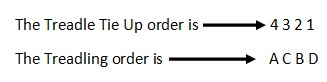
- Treadle A uses Treadle Tie up 4
- Treadle B uses Treadle Tie up 2
- Treadle C uses Treadle Tie up 3
- Treadle D uses Treadle Tie up 1
Let’s re-order the Treadle Tie ups, to reflect this:

Putting it all back together, to look like the tie up and treadling diagrams that weavers are used to, we get this:
While this new Tie Up and treadling diagram looks complicated, when you are weaving, it becomes very simple, very quickly. This allows you to even out the stresses on your body, which might mean that you get to weave a little longer!

From the Course Catalog:
The Secrets of Liftplans, Treadling, and Tie-Ups – Deep dive into the details of Liftplans, Treadlings, and Tie-Ups, how to read them, and how to change them to suit your loom.