
If your stripes are wide, it makes sense to wind them one color at a time, holding however many ends you prefer to wind at once. But what if you’re mixing colors together thread by thread or very nearly, as in color and weave? You could wind the warp one thread at a time, starting and stopping with each color change, but that takes a ton of effort and is very slow.
I don’t like doing things that are slow and take a lot of effort! Instead, I prefer to figure out how to wind my color and weave “patterns” multiple ends at a time, according to the ratio I need of each color. When there isn’t a simple ratio to give me the pattern I want, I modify it by parking and unparking colors when necessary. “Parking” a thread means to leave it attached to the board or mill while you wind other yarns, so that you can pick it back up again later without tying it back on. Academy members can find out more about this by clicking the link at the bottom of this post.
A real world example
I recently wound a warp for a series of color and weave gamps that’s a perfect example of how I like to wind these kinds of warps.
Here’s the whole gamp:
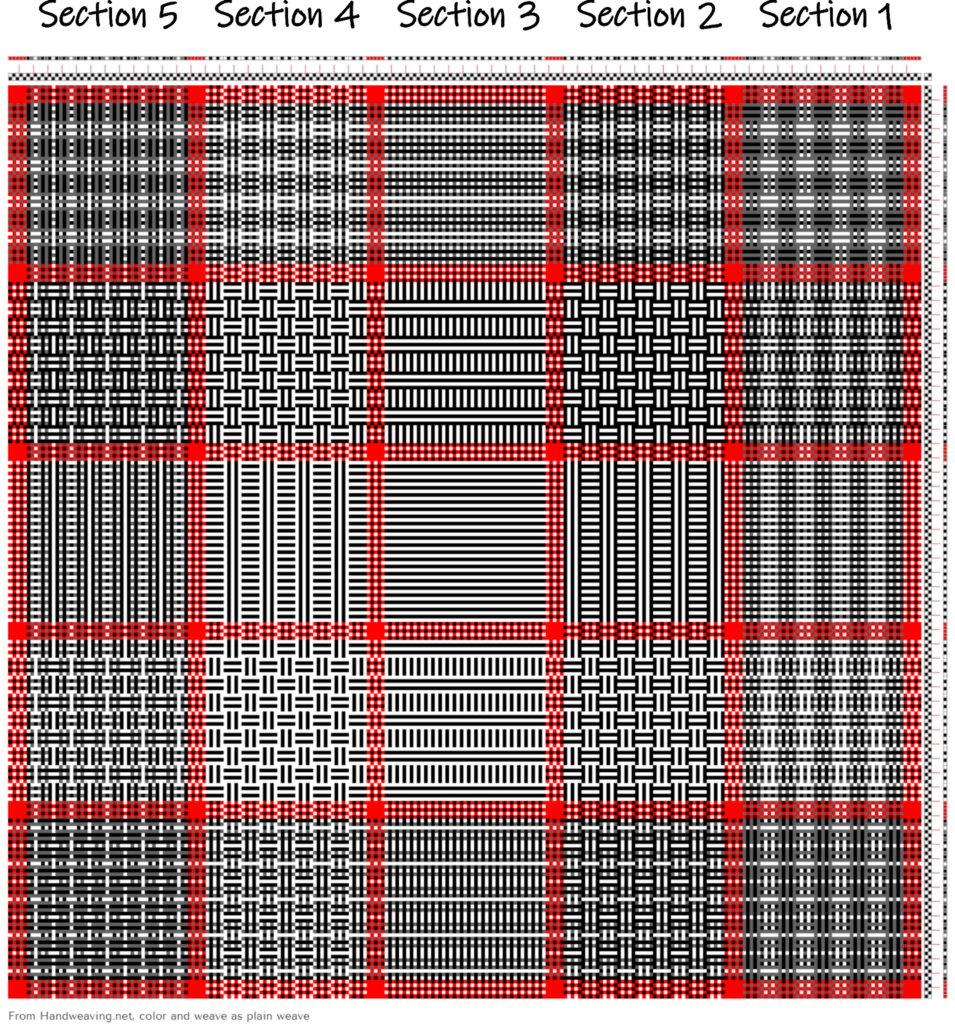
As you can see, each section has a different color and weave order, and I chose to approach each one a little differently. Although I wound the sections in order from right to left, I’ll explain what I did from the most straightforward section to the most complicated.
Section 3
The middle section is super easy to wind since it simply alternates black and white:

For this section, I just held one black thread and one white thread together in my hand and wound them two at a time. That meant my threading cross had two threads together each time, and I just made sure to thread the white one to the right of the black one. (There’s one more white end than black; it got wound with one red end from the divider between this section and the next.)
Section 5
Section five looks complicated but it’s actually almost as easy as Section 3. Here’s its color order:

It may not be immediately obvious, but this is very close to a 1:1:1 ratio of black, white, and grey. Here’s the same color order, now with gaps between each group of five threads:

Pretend that each of those gaps is a white thread, and then consider each group of three threads (or two threads + gap):

If you can see those skinny red lines, you’ll see that each group of three threads (or two threads + gap) contains one black, one grey, and one white/gap.
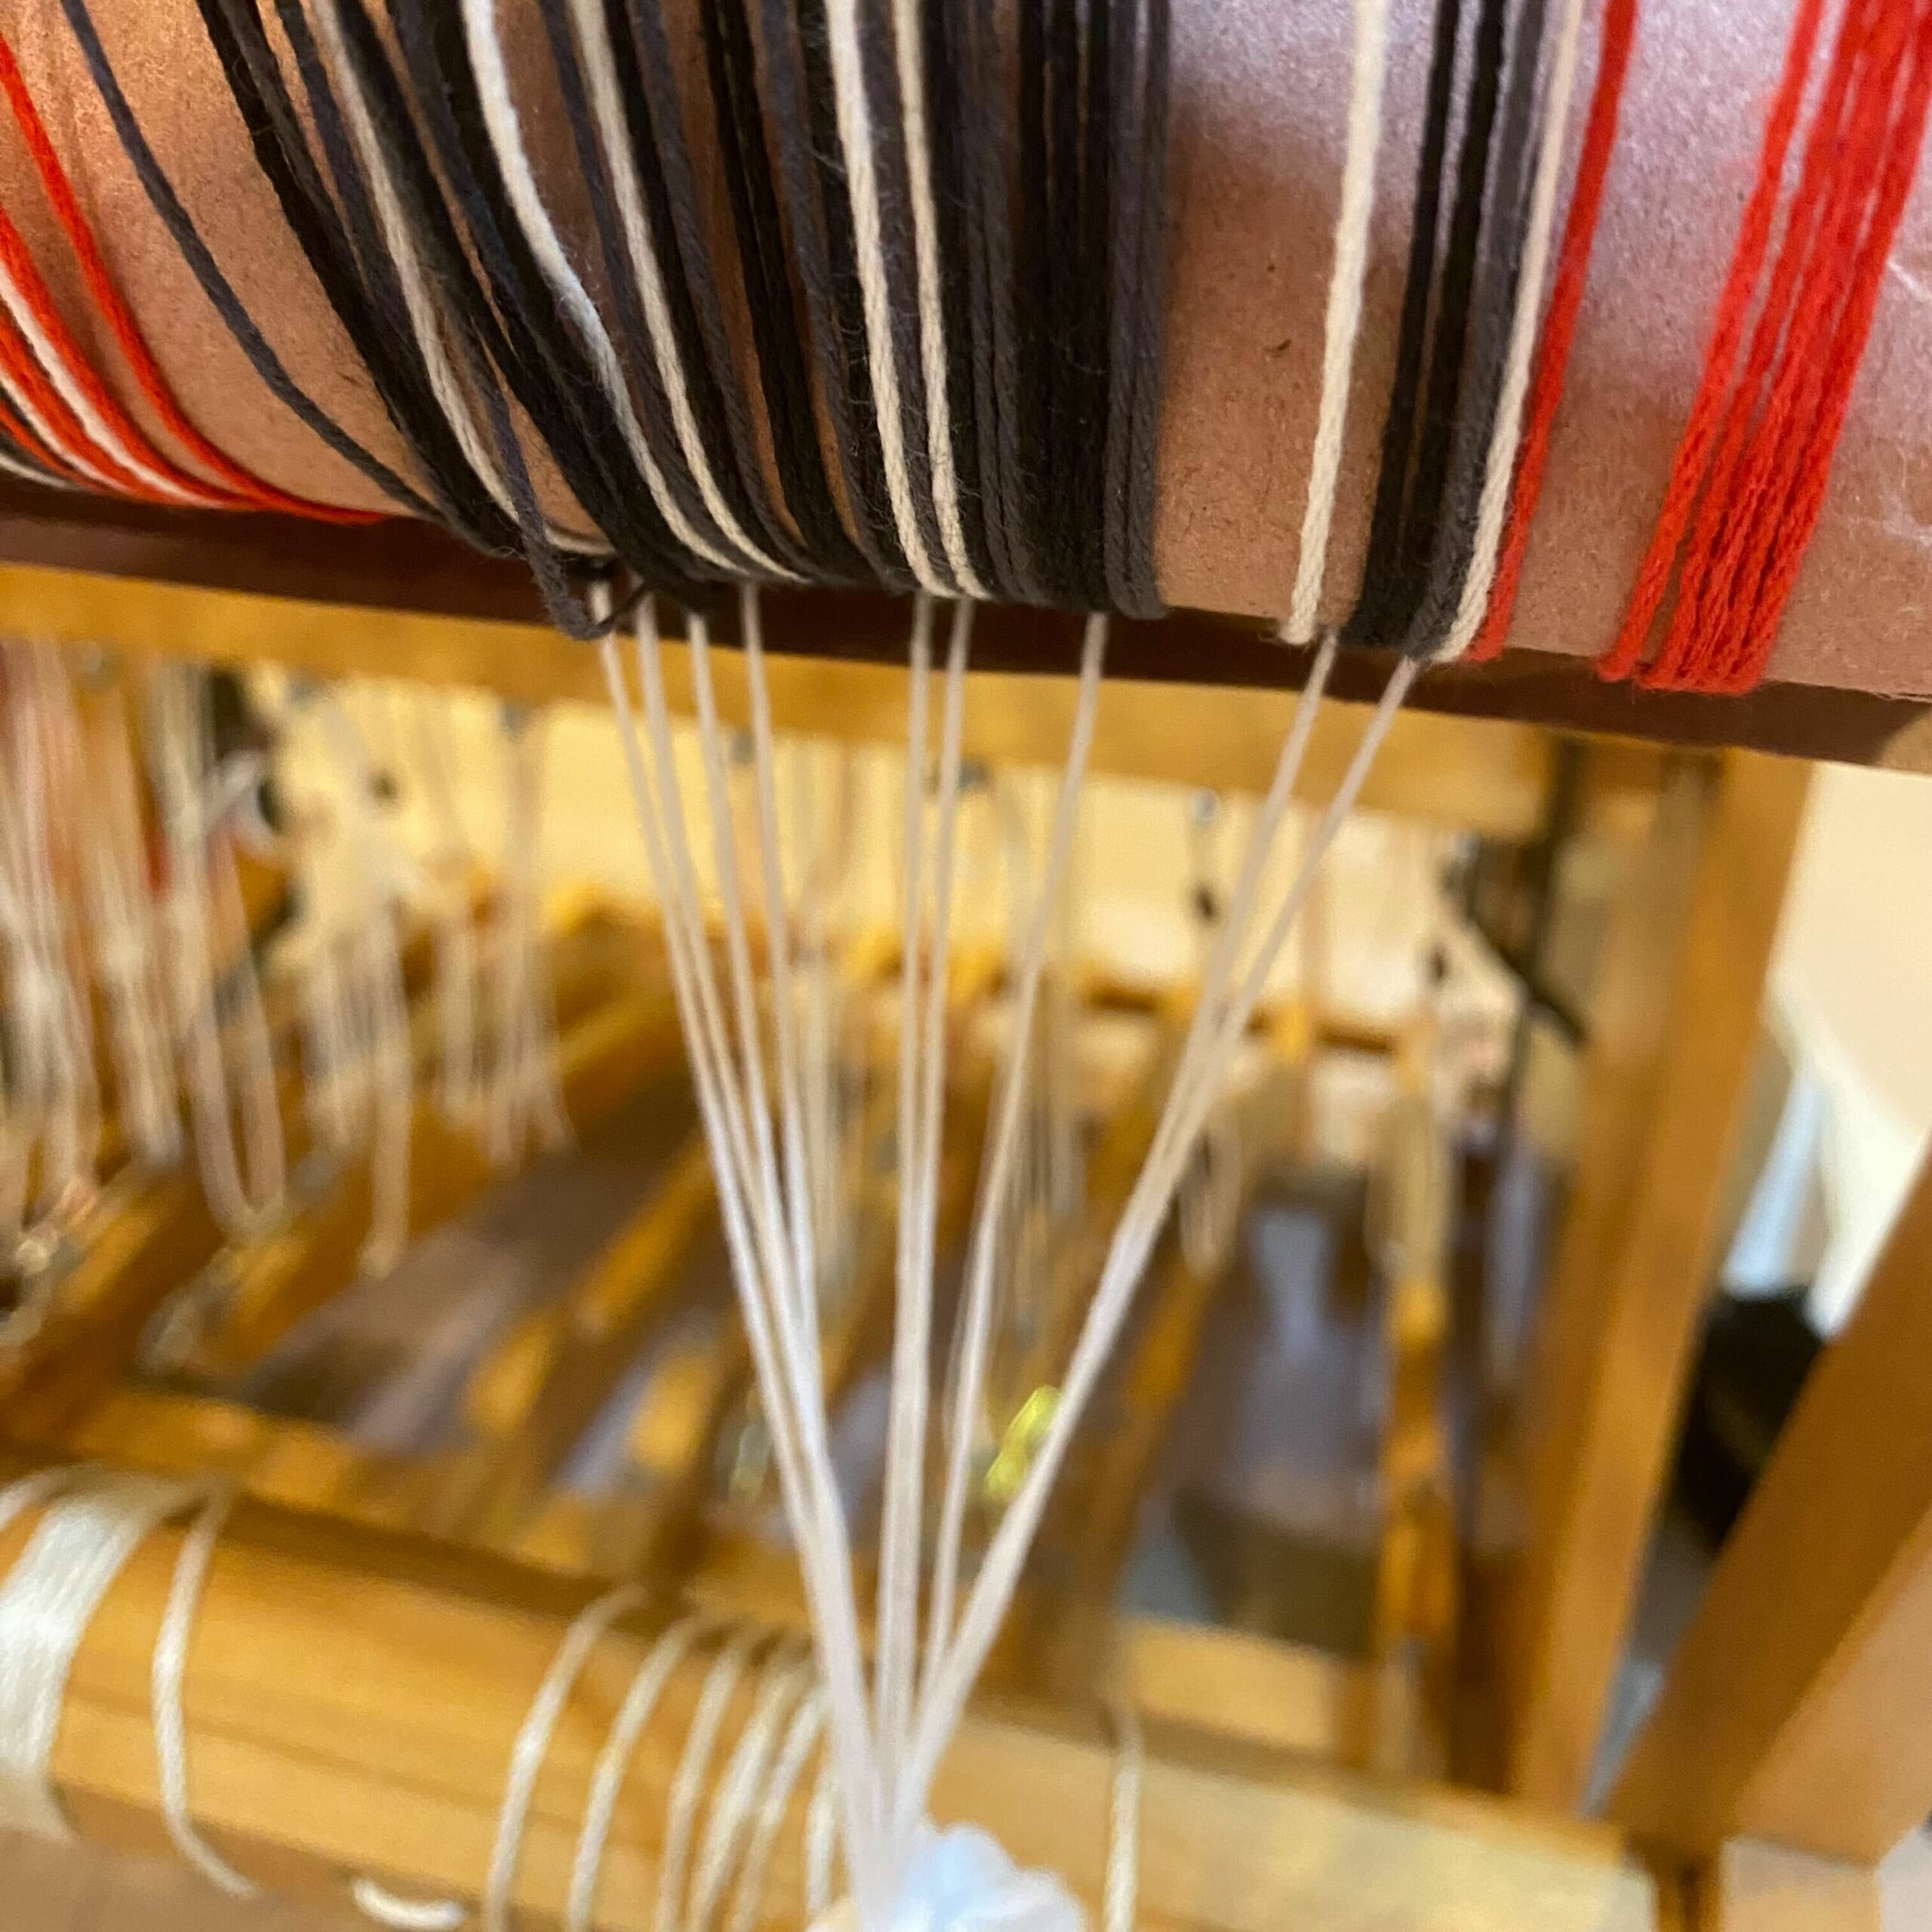
I wound this section three ends at a time, as 1 white + 1 black + 1 grey. This gave me all the ends I needed, plus an extra white end wherever there’s a gap. As I was threading, I simply skipped those extra white ends and left them hanging off the back of the loom. Easy peasy!
I’ve kept those threads corralled by chaining them up with a little weight on them as I weave. Bonus: I can see how much of the warp I’ve used up by measuring how long they are.
Section 4
The color order for Section 4 looks like this:

It’s very nearly the same as Section 3; the only difference is that every third black end is left out. I could have used the same trick for this section as for Section 5 and wound 1 black + 1 white all the way across, then dropped the black ends I didn’t need.
Instead, I went with a different option that didn’t create extra threads for this section. It’s a little more complicated, but it’s an example of another option you’ve got for dealing with funny color and weave patterns — an option that doesn’t create a bunch of surplus threads, which might be more attractive to folks who dress their looms from front to back.
Before I explain how I wound this section, let’s take a detour to define “there and back again.”
There and back again, aka winding circuits
By “there and back again,” I mean one complete winding circuit on the warping board or mill. In my case, this meant beginning at the start/stop peg near the bottom; going around and around the mill, through the cross, and around the final peg at the top; then going back through the cross, around and around the mill, and returning to the start/stop peg at the bottom.
You might be working on a board instead of a mill, or you might have your cross at the bottom instead of the top. No matter what tool you’re using and whether you start at the top or bottom (or the left or right!), one circuit means going from wherever you start to the peg at the opposite end, and then back to where you started. In short, you go “there” (to the end) and “back again” (to the start).
Each full circuit creates two warp ends for each thread you’re holding as you wind.
If you’re winding one thread at a time, a circuit gives you two warp ends: one for “there” and one for “back again”. For instance, winding a circuit with one thread of white gives you two white warp ends.
In a color order, it’d look like this:

If you’re winding two at a time, a circuit creates four warp ends: two for “there”, and two for “back again”. If the two threads you’re winding are different colors, you wind up (ha!) with two ends of each color after one full circuit.
For instance, winding a circuit with one thread of white and one of black gives you one pair of white+black for “there” and a second pair for “back again”.
So a color order like this…

…could be wound with one circuit of white+black.
BUT, since each white+black pair is together in the cross, you can thread them in any order you want.
That means that any of these color orders…


…can be wound with one circuit of white+black.
Okay, armed with that, let’s go back to the color order for Section 4:
Here it is another again, now with some spaces added:

This time the spaces aren’t extra threads, they’re places where I parked and unparked the black.
That first lonely white end was wound with the red divider that came before it, so the fancy stuff started with the next group of eight threads.
That group of eight is two circuits of white+black, so that’s what I wound. Then I parked the black and wound a circuit with white by itself. I repeated that pattern (two circuits of white+black, one circuit of white alone) four times total, and then finished off with one last circuit of white+black.
Section 2
…is exactly like Section 4, only with black and white reversed.
Section 4:
Section 2:

I wound it the same way, except that I parked and unparked the white rather than the black.
Section 1
That leaves us with Section 1. Here’s its color order:

and here it is again, spaced out into circuits:

Can you see how similar it is to Sections 2 and 4?
The first grey end was wound with the red divider, so the fancy stuff started with the next group of four threads.
I wound those first four threads as a circuit of grey+black. Then I parked the black and picked up white, and wound another circuit, this time of grey+white. Then I parked the white and wound a circuit of grey on its own.
I did that whole thing four times, and then finished with a final circuit of grey+black.
Look for ratios and circuits
When faced with a complex color order that mixes stripes of one or two ends per color, first look to see if you can identify the ratio of the colors. It may be possible to hold them all together and wind without starting and stopping at all, as I did in Section 1. This works a treat for log cabin and shadow weave, for instance.
When the ratio isn’t perfect but it’s close, you can still use it and just wind a few extra threads, as I did in Section 5. This works well for log cabin in which all the blocks are bounded by the same color on both sides.
When there’s no consistent ratio, look to see if you can divide the color order up into groups in which all the colors have the same multiple of two ends. If you can, then you can wind those groups as circuits with one or more ends held together. Where the threads change from one circuit to the next is a spot where you can park and unpark the colors you don’t need – or where you can cut off one set of threads and tie another back on, whichever you find easier.

From the Course Catalog:
Color Recipes 1: Value and Stripes – Designing with color and stripes of all sizes
The Color Editor – Gradients – How to use the Color Editor from Handweaving.net to design the gradients that you love.
From the Weavers Toolbox: