
Ice dyeing is a fun and easy summer project that requires very little room, time and equipment. The results are delightfully unpredictable and never the same!
How it works:
Ice dyeing is done with cellulose fiber such as cotton, linen, hemp, and rayon using fiber-reactive dyes. Silk can also be used, but colors will impact silk differently. The high amount of soda ash used in ice dyeing may also weaken the silk, so try a sample first.
Fiber-reactive dyes adhere to cellulose fiber using a covalent bond. This means the dye isn’t just “sticking” to the top of the fiber as paint or stain, it’s changing the fiber on a molecular level forming a permanent color change. This bond in cellulose fiber is facilitated by raising the PH of the fiber, in this case with soda ash.
The dye itself can not bond to the fiber alone, it can only stain it like it can stain your hands and equipment. But it’s not stable as a stain, it will fade and wash out, in the dye world we call this a fugitive dye. But, when the dye is activated by the higher PH from the soda ash, it is able to adhere to the cellulose fibers permanently. When the dye meets the fiber, water, and soda ash, it has a short active working time, as short as 20 minutes, to bond to the fibers before it exhausts and it can no longer dye effectively. It will dye strongly right away, then weaken over time even if there are still dye particles unattached to the fiber.
By using melting ice, the dye, soda ash, and fiber are introduced at different times, allowing the dye to disperse unevenly. If the dye is a mix of several different colors, each color will have a different activation time and the color might “break” as the ice slowly melts, allowing you to see all the hues the dye is made of. This is similar to the experiment we do as kids where you put a dot of a colored marker on a coffee filter and let the water slowly carry the pigment up you can see the hues used that created your marker color.
There are two methods for ice dyeing. In one you presoak the yarn in a soda ash bath, the other you add the soda ash on top of the ice. Both will yield a different effect on the yarn.
What you need:
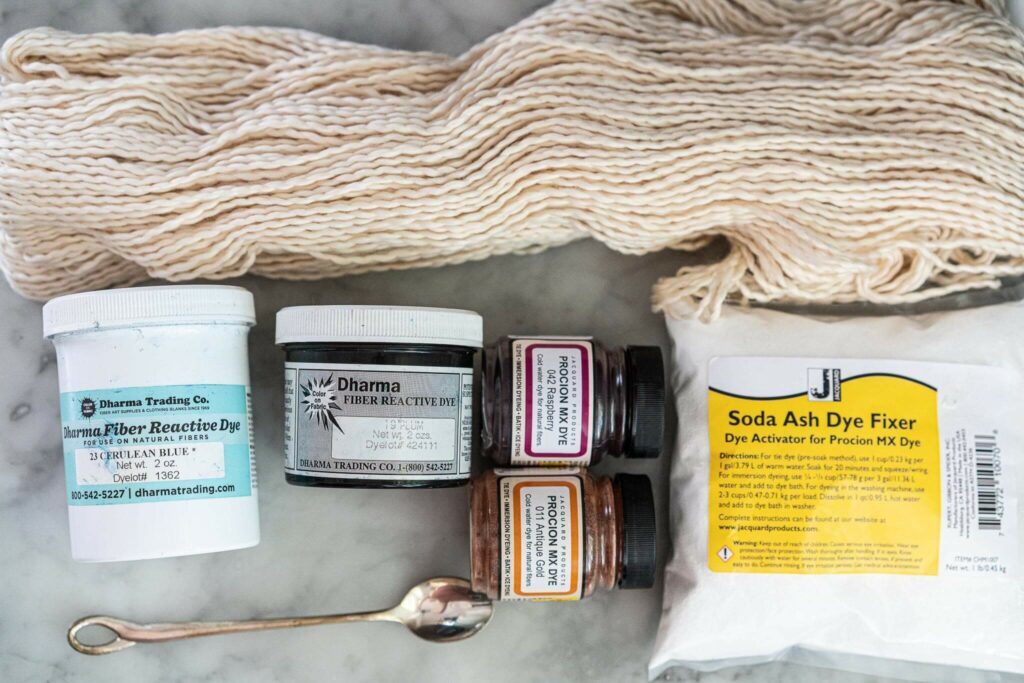
*Skein or warp of cellulose fiber yarn: rayon, cotton, linen. Dyeable skeins are available from fiber art supply companies (such as Dharma Trading Company). The sample skeins are Pima Air DK from Wool2Dye4.
Note: If you wind your own skein or warp from a cone or ball or the yarn was not prepped for dyeing already, the skein should be washed gently in mild detergent to remove any oils or surface preparations applied to the fiber. These finishes can resist dye.
*Approximately one cup of soda ash
*At least 2 colors of fiber-reactive dyes, (Jaquard, Procion, or Dharma Fiber Reactive Dyes are a few of the brands available)
*Ice or Snow (samples used a 10 lb bag of ice from the convenience store)
*Washing tubs and buckets
*PH-neutral detergents such as Synthrapol
*A rack such as a baking cooling rack, or a rack that can fit in a sink or roasting pan. (These should be used only for dyeing projects in the future.)
*Plastic tarps for protecting tables and surfaces.
*Plastic gloves
*Particle mask
Note on color selection: Tiens Classes on color also apply to dyeing! Selecting complimentary colors will give you areas with duller browns and greys where the color mix. I personally like to select colors analogous on the color wheel or primaries that will blend together to make more colors or rainbows.
Black dye is made of many colors, some brands offer several different black options., Some are bluer, greener or more purple for example. Blacks will break out to those colors, not grey.
Step 1: Prepare your yarn
You can pre-soak your yarn in soda ash, or add soda ash to the yarn and ice while dyeing. You can start with your yarn wet or dry, each method will give you a different dye result. I will show you the results of a few of these methods here.
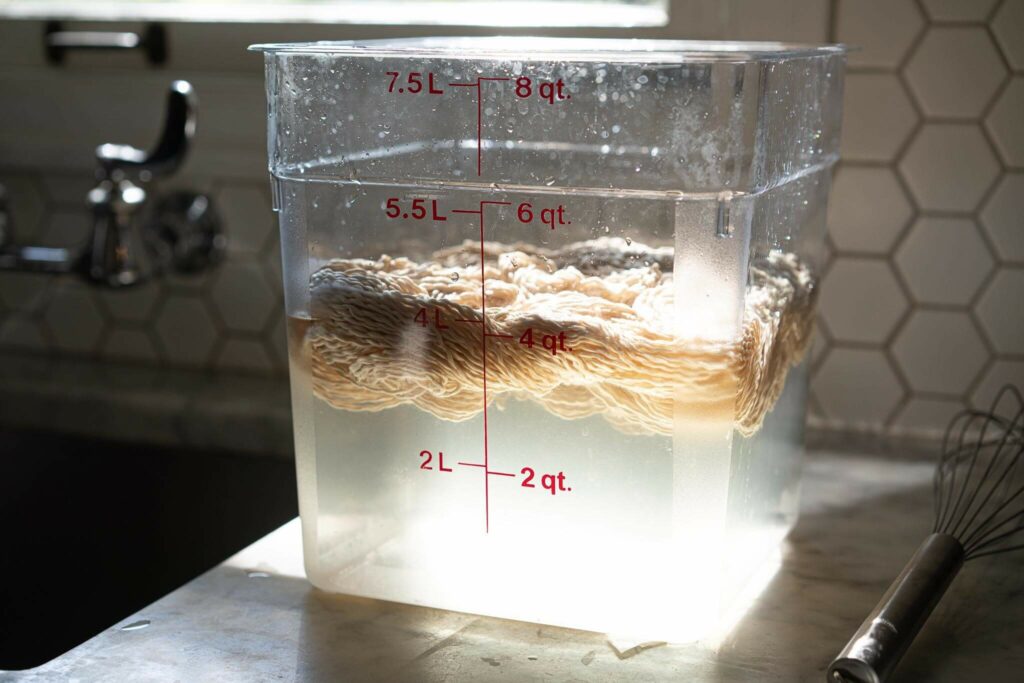
Soda Ash Soak Method:
Prepare the soda ash bath using 1 cup of soda ash and 4 quarts/1 gallon of hot tap water. Soak the prepared skein in the soda ash water for 15 minutes. Remove and squeeze the excess liquid from the skein. (Soda Ash can dry your skin, so gloves are recommended, but not necessary). The bath can be stored to use on future dye projects.
Step 2– Place the skein on the rack over a pan or tarps or in a sink. Working outside will make clean-up easier. If working inside, the sooner you clean up dye spills the better. In stainless steel, a little bleach and scrubbing will remove stains. The dye will dye wood surfaces (because wood is cellulose) and can stain some plastics, but I’ve dyed in apartment bathrooms and kitchens and been able to remove any potential stains on non-textile surfaces with simple bleach and elbow grease.
Step 3-Lay your prepared skeins on top of the rack.
Step 4-If your skein isn’t pre-soaked in soda ash, sprinkle a hearty amount of soda ash covering the entire skein (about 2-4 tablespoons of soda ash per skein)
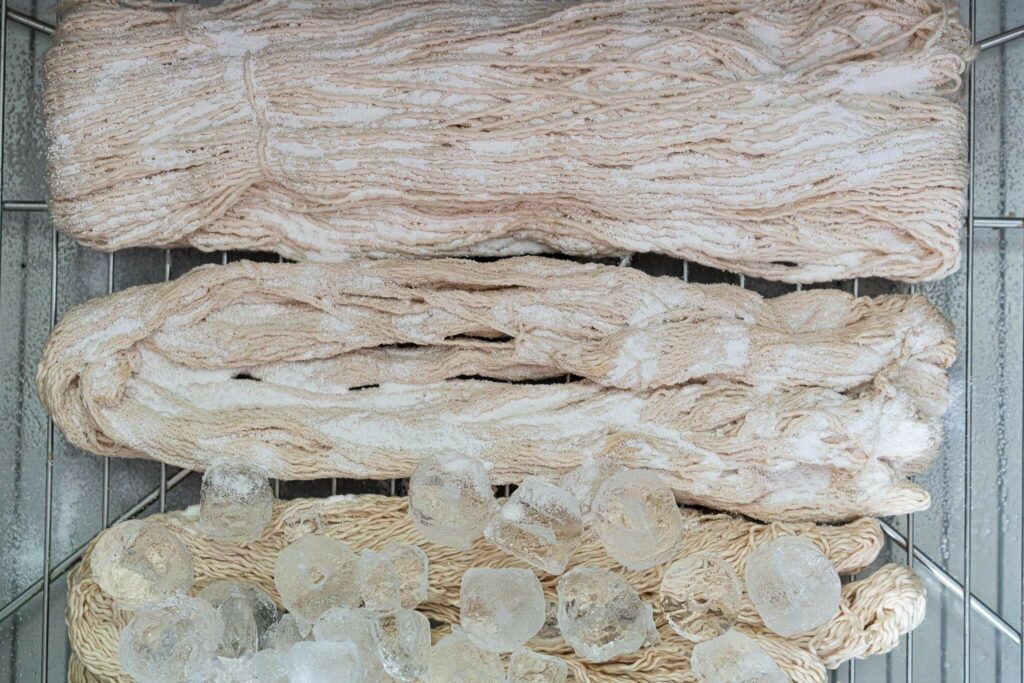
Step 5 -Top the skeins with ice or snow. Make sure the ice or snow has contact with the entire skein.
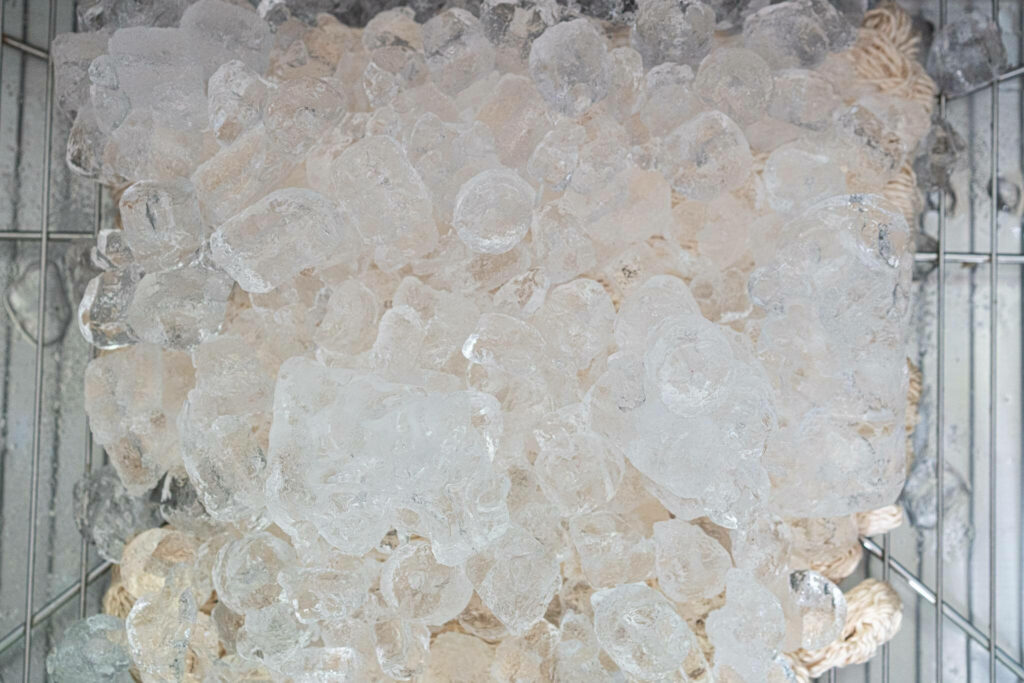
Step 6-Put on a particle mask and gloves. Sprinkle dye directly on the ice. There’s no real science to this, less dye will make a pastel yarn and more dye will make a vivid yarn. Too much dye will wash down the drain.
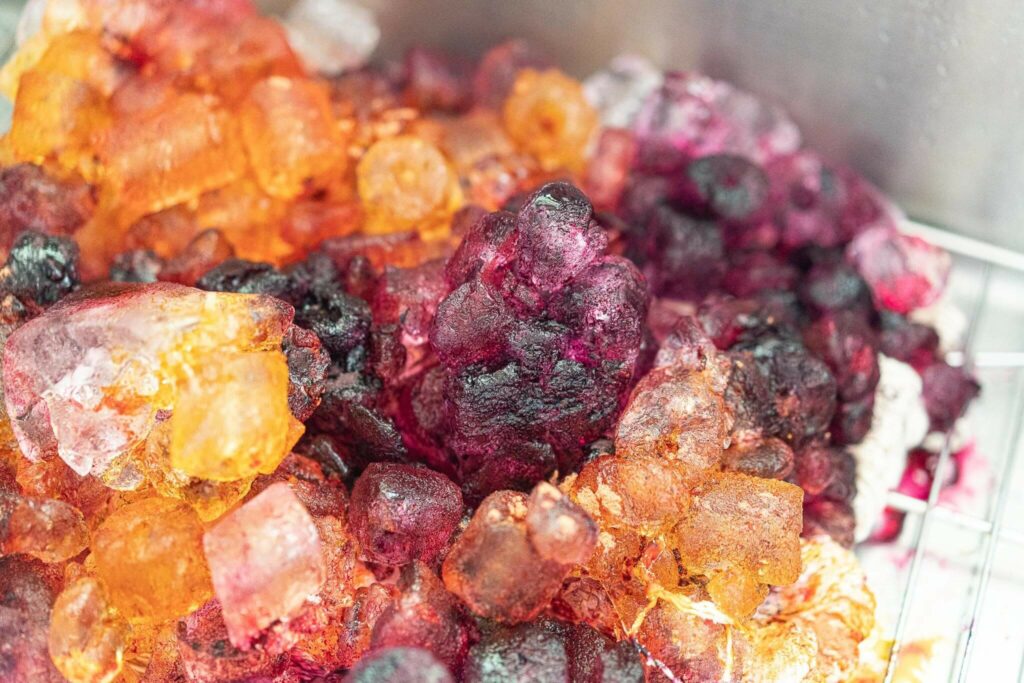
Step 7-Wait until the ice is completely melted and allow the fibers to bond to the dye. This can be several hours, or even overnight, depending on the temperature of the air where the dyeing is being done. Some people recommend leaving the yarn overnight to ensure full melting of the ice. This is fine to do (if you have the patience to wait!)
Step 8– Wash out the excess dye in running water. You might want to wear gloves for this step.
Step 9 -When the water is mostly clear, wash it a final time with a drop of detergent, and rinse it again.
Step 10– Hang to dry.
The results of the different methods:
I used the same yarn, same chemicals and same dye time, for each of these skeins, but the method I used to ice dye yielded very different results.
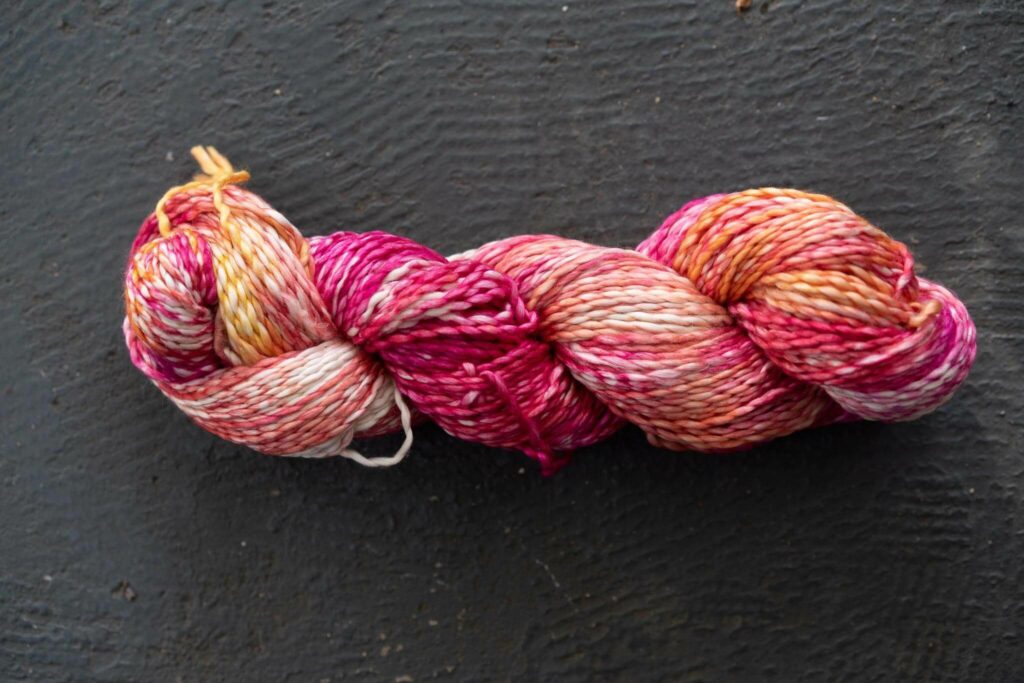
The soda ash soaked skein has smoother gradients as the dye and ice worked through the evenly treated yarn at a slower pace. The result is softer and more feathered.
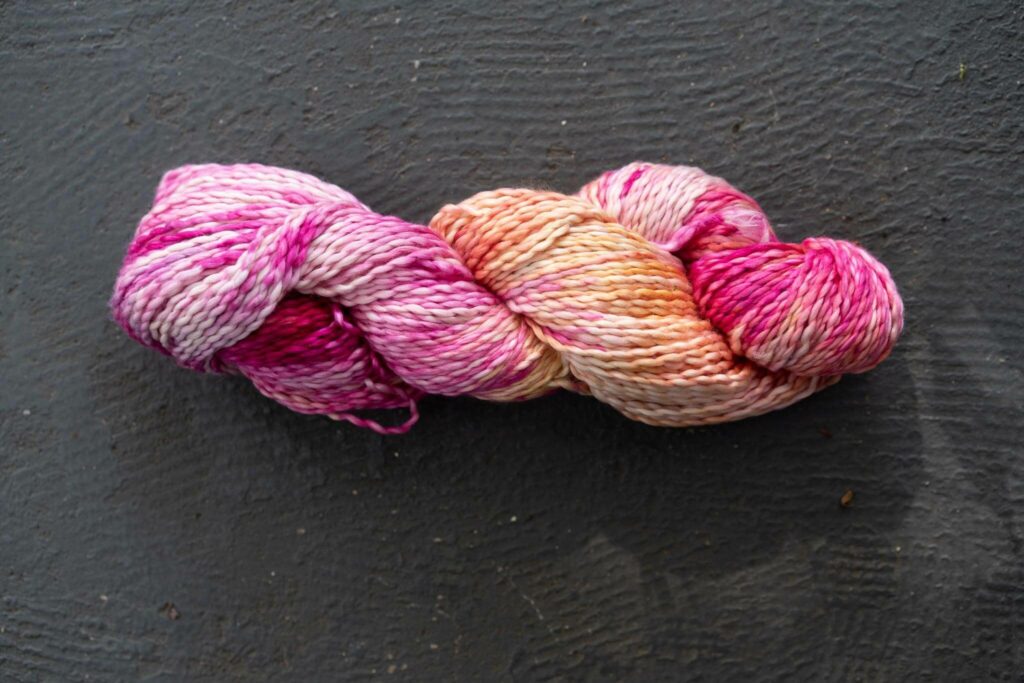
The pre-wetted yarn with soda ash applied directly is more dramatic. The color is vivid and there are sharp distinctions between the dyed and undyed yarn. The color also doesn’t penetrate through all the plies. It seems the dye and the soda ash only partially wicked into the wet fiber before exhausting. It hit fast and hard, then dyed quick resulting in a brighter dye with less graduation.
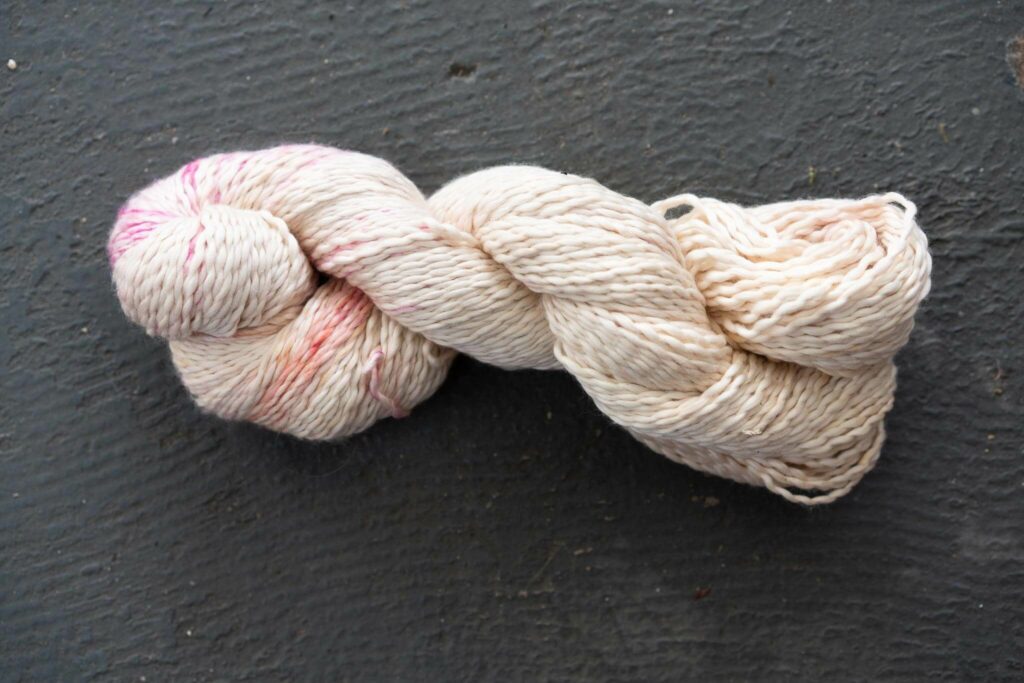
The dry yarn that was treated with soda ash only took on small splashes of color and remained mostly white. This is probably because the ice water, dye and soda ash took longer to wick up through the dry yarn, the dye was exhausted before it could attach to the fiber. Although this skein looks uninspiring compared to the others, these random spots will weave up as “dashes” and will make a fabric that will have a really interesting look.
These are just three different methods to dye your skeins or warps. You can try other methods: sprinkling your dye directly to your skein before topping it with ice and soda ash for example. Using crushed ice or snow will have different results than cubed ice. It’s always a fun surprise to see what you get, and your yarns will be completely one-of-a-kind!
I hope that you will try ice dyeing, and share your results, both in yarn, and woven form.
Happy Dyeing!

From the Course Catalog:
Color Mixing 1 – Explore the magic of color, and how it interacts in woven fabrics.
Hue and Saturation – This class will expand your knowledge of two of the three properties of color, allowing you to confidently create a palette for your projects
Understanding Value – The third property of color is value. Learn why value is important, how to judge it, and how to use it effectively in your designs.